Raycasting: The Algorithm That Made First-Person Games Possible
A technical deep dive into the DDA raycasting algorithm, the math behind Wolfenstein 3D, how a 2D grid produces a believable 3D perspective, and what it taught us about rendering pipelines.
2025-02-10
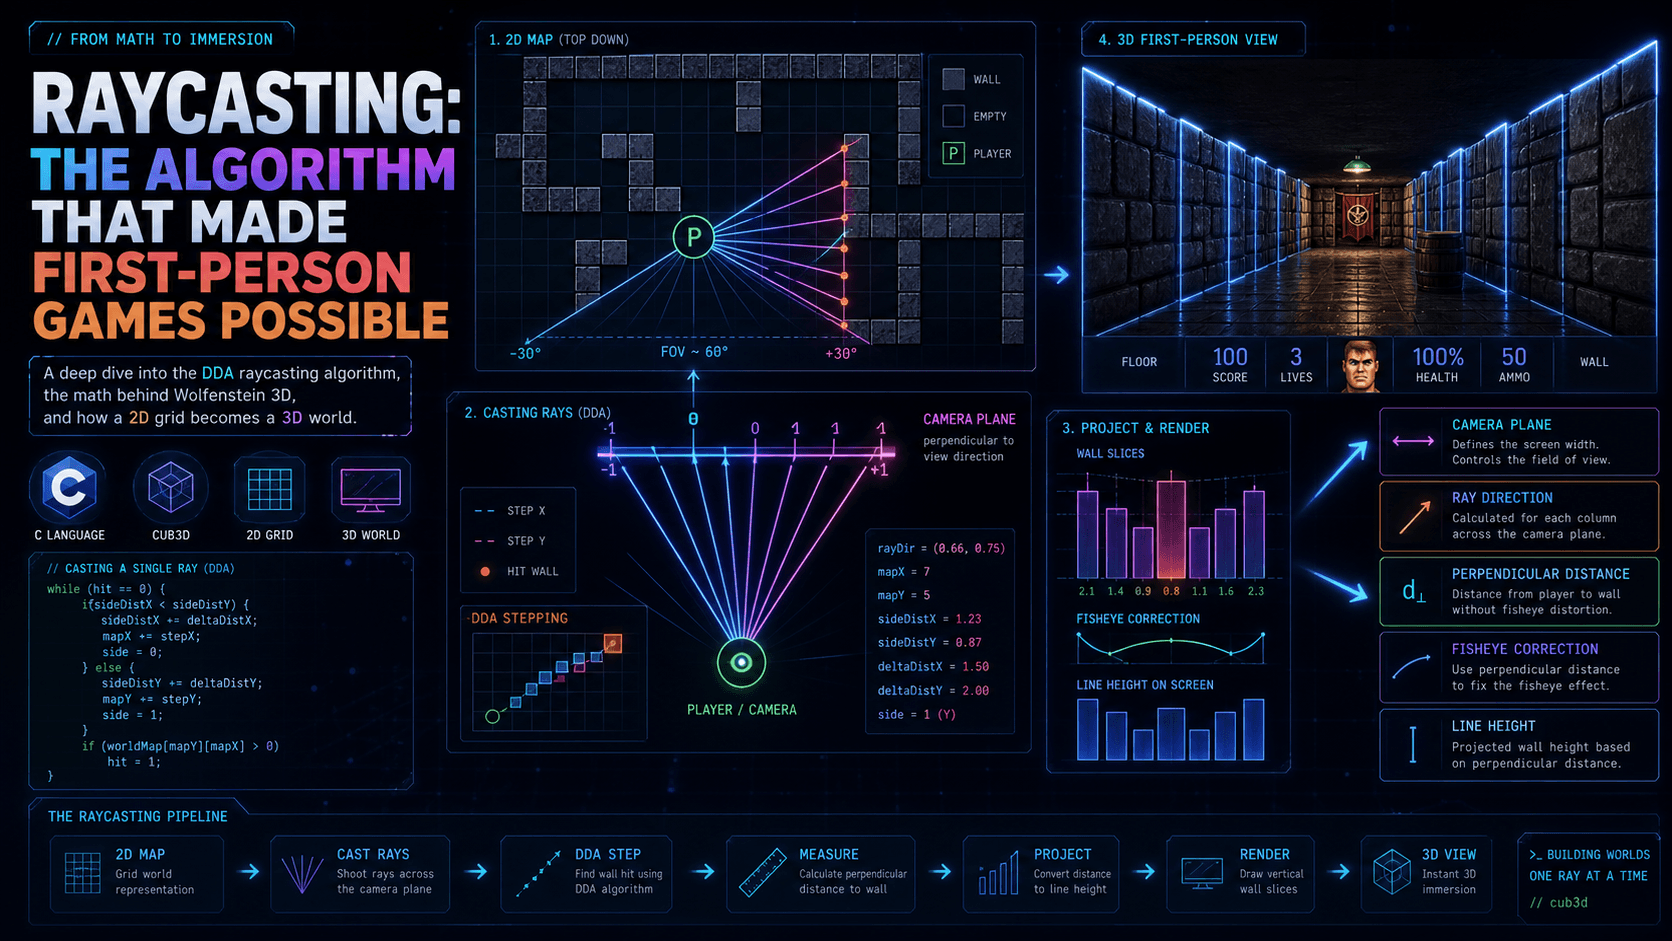
Raycasting: The Algorithm That Made First-Person Games Possible
In 1992, id Software shipped Wolfenstein 3D on hardware with no GPU, no hardware acceleration, and a CPU running at 33MHz. The game rendered a fully navigable 3D world in real time on a machine that would struggle to open a modern web page. When I built cub3d, a software raycaster from scratch in C, I finally understood exactly how they pulled it off.
This is the math behind it.
The Core Illusion
A raycaster is not a 3D engine. There's no actual 3D geometry. The world is stored as a 2D grid, just an array of integers where 0 means empty space and 1 (or higher) means a wall:
1 1 1 1 1 1 1 1
1 0 0 0 0 0 0 1
1 0 1 0 0 0 0 1
1 0 0 0 0 1 0 1
1 0 0 0 0 0 0 1
1 1 1 1 1 1 1 1
The 3D illusion comes from a single geometric insight: if you know how far away a wall is, you know how tall it should appear on screen. A wall 1 unit away fills the screen. A wall 4 units away appears a quarter as tall. Distance = apparent size. That's the entire conceptual basis.
The algorithm fires one ray per screen column, measures how far that ray travels before hitting a wall, and uses that distance to draw a vertical strip of the appropriate height. Do that for all 640 columns (or however wide your screen is), and the resulting strips form a convincing 3D scene.
The Player as a Vector
The player's state is not just a position. It's three things:
typedef struct s_player {
    double pos_x, pos_y;     // position in the grid
    double dir_x, dir_y;     // direction vector (always unit length)
    double plane_x, plane_y; // camera plane vector
} t_player;
The direction vector (dir_x, dir_y) points where the player is looking. It always has unit length.
The camera plane (plane_x, plane_y) is perpendicular to the direction vector and represents the screen's width in world space. Its length controls the field of view: a longer plane means a wider FOV.
          Camera Plane
    <------------------->
         plane vector
              |
              | dir vector
              v
           (player)
For a typical 66 degree FOV, with direction (1, 0) (looking right), the camera plane would be (0, 0.66).
When the player rotates, both vectors rotate together. The camera plane must stay perpendicular to the direction:
// Rotate direction and camera plane by angle `rot`
double old_dir_x = player.dir_x;
player.dir_x = player.dir_x * cos(rot) - player.dir_y * sin(rot);
player.dir_y = old_dir_x  * sin(rot) + player.dir_y * cos(rot);

double old_plane_x = player.plane_x;
player.plane_x = player.plane_x * cos(rot) - player.plane_y * sin(rot);
player.plane_y = old_plane_x    * sin(rot) + player.plane_y * cos(rot);
Generating One Ray Per Column
For each screen column x (from 0 to screen_width - 1), we compute a ray direction by combining the player's direction with a fraction of the camera plane:
// camera_x goes from -1 (left edge) to +1 (right edge)
double camera_x = 2.0 * x / screen_width - 1.0;

double ray_dir_x = player.dir_x + player.plane_x * camera_x;
double ray_dir_y = player.dir_y + player.plane_y * camera_x;
When camera_x = 0 (center column), the ray goes exactly where the player is looking. At camera_x = -1 and +1, the rays point to the leftmost and rightmost edges of the visible field.
Now we have a ray starting at (player.pos_x, player.pos_y) going in direction (ray_dir_x, ray_dir_y). The question is: where does it hit a wall?
DDA: Stepping the Grid Without Floating-Point Explosions
The naive approach, advancing the ray by tiny increments and checking if you're inside a wall cell, works but is slow and imprecise. The right approach is Digital Differential Analysis (DDA), an algorithm that steps exactly from one grid cell boundary to the next.
The key insight: as the ray travels through the grid, it crosses vertical lines (x = 1, 2, 3, ...) and horizontal lines (y = 1, 2, 3, ...). Between any two consecutive crossings, the ray is entirely inside one grid cell. So we can advance the ray one grid-line crossing at a time, checking for walls at each step.
To do this efficiently, we precompute how far the ray must travel between consecutive crossings:
// Current grid cell
int map_x = (int)player.pos_x;
int map_y = (int)player.pos_y;

// How far does the ray travel per unit step in each axis?
// If ray_dir_x is near zero, the ray is nearly horizontal; it takes forever to cross a vertical line
double delta_dist_x = (ray_dir_x == 0) ? 1e30 : fabs(1.0 / ray_dir_x);
double delta_dist_y = (ray_dir_y == 0) ? 1e30 : fabs(1.0 / ray_dir_y);
delta_dist_x is the distance the ray travels between two consecutive vertical grid lines. delta_dist_y is the same for horizontal lines. These are constant for a given ray direction. They don't change as the ray steps through the grid.
We also compute the initial distances to the first grid crossing in each direction:
double side_dist_x, side_dist_y;
int step_x, step_y;

if (ray_dir_x < 0) {
    step_x = -1;
    side_dist_x = (player.pos_x - map_x) * delta_dist_x;
} else {
    step_x = 1;
    side_dist_x = (map_x + 1.0 - player.pos_x) * delta_dist_x;
}

if (ray_dir_y < 0) {
    step_y = -1;
    side_dist_y = (player.pos_y - map_y) * delta_dist_y;
} else {
    step_y = 1;
    side_dist_y = (map_y + 1.0 - player.pos_y) * delta_dist_y;
}
Now the DDA loop: always advance to whichever crossing comes first.
int hit = 0;
int side;  // 0 = hit a vertical wall face, 1 = hit a horizontal wall face

while (!hit) {
    if (side_dist_x < side_dist_y) {
        side_dist_x += delta_dist_x;
        map_x += step_x;
        side = 0;
    } else {
        side_dist_y += delta_dist_y;
        map_y += step_y;
        side = 1;
    }

    if (map[map_x][map_y] > 0)
        hit = 1;
}
Each iteration advances the ray by exactly one grid-line crossing. No tiny increments, no floating-point drift. The side variable tells us whether we hit a vertical face (ray entered from left or right) or a horizontal face (entered from top or bottom). That matters for texturing.
Perpendicular Distance and the Fisheye Proof
Once the DDA loop terminates, we know which cell the ray hit and which face it entered from. Now we need the distance.
The obvious approach: compute the Euclidean distance from the player to the hit point.
// DO NOT DO THIS
double dist = sqrt((map_x - player.pos_x) * (map_x - player.pos_x) +
                   (map_y - player.pos_y) * (map_y - player.pos_y));
This gives the wrong result. With Euclidean distance, walls appear curved. The infamous fisheye distortion. Walls bow outward on the sides and inward in the center.
Why? Because the screen is flat, not curved. The rays at the left and right edges travel farther to the wall than the center ray, even if that wall is perfectly flat and perpendicular to the player. Far-edge rays produce shorter wall strips than they should, causing the curvature.
The fix is to use perpendicular distance: not the distance along the ray, but the distance projected onto the player's direction vector. This is the distance from the player to the plane containing the wall face.
Because of how DDA is set up, perpendicular distance has a clean formula:
double perp_wall_dist;

if (side == 0)
    perp_wall_dist = side_dist_x - delta_dist_x;
else
    perp_wall_dist = side_dist_y - delta_dist_y;
side_dist_x after the loop is the distance to the grid line past the hit cell. Subtracting delta_dist_x gives the distance to the grid line at the hit cell, which for a vertical face is the perpendicular distance. The math cancels out the fisheye effect because perpendicular distance scales linearly with actual depth.
Wall Height Formula
With perpendicular distance in hand, the wall height formula is straightforward perspective projection:
int line_height = (int)(screen_height / perp_wall_dist);

int draw_start = -line_height / 2 + screen_height / 2;
if (draw_start < 0) draw_start = 0;

int draw_end = line_height / 2 + screen_height / 2;
if (draw_end >= screen_height) draw_end = screen_height - 1;
A wall 1 unit away: line_height = screen_height, fills the screen. A wall 2 units away: half the height. A wall 0.5 units away: twice the height (clamped). draw_start and draw_end are the pixel rows where this column's wall strip begins and ends.
Texture UV Mapping
A solid-color wall is a raycaster. A textured wall is a game. Texture mapping requires knowing exactly where on the wall face the ray hit.
U coordinate (horizontal within the texture):
double wall_x;  // exact position on the wall face where the ray hit (0.0 to 1.0)

if (side == 0)
    wall_x = player.pos_y + perp_wall_dist * ray_dir_y;
else
    wall_x = player.pos_x + perp_wall_dist * ray_dir_x;

wall_x -= floor(wall_x);  // keep only the fractional part

int tex_x = (int)(wall_x * tex_width);  // pixel column in the texture

// Mirror the texture for certain ray directions to avoid artifacts
if (side == 0 && ray_dir_x > 0) tex_x = tex_width - tex_x - 1;
if (side == 1 && ray_dir_y < 0) tex_x = tex_width - tex_x - 1;
V coordinate (vertical within the texture) for each pixel row being drawn:
double step = 1.0 * tex_height / line_height;
double tex_pos = (draw_start - screen_height / 2 + line_height / 2) * step;

for (int y = draw_start; y < draw_end; y++) {
    int tex_y = (int)tex_pos & (tex_height - 1);
    tex_pos += step;

    uint32_t color = texture[tex_y * tex_width + tex_x];
    screen_buffer[y * screen_width + x] = color;
}
step is how fast we move through the texture vertically. If line_height equals tex_height, step = 1.0, one texture pixel per screen pixel. If the wall is far away, line_height < tex_height and step > 1.0, meaning we skip texture rows and compress the texture vertically.
Four Wall Faces
The side variable from DDA tells us vertical face or horizontal face. Combined with the ray direction, we get the cardinal direction:
int texture_index;

if (side == 0) {
    if (ray_dir_x > 0)
        texture_index = TEXTURE_EAST;
    else
        texture_index = TEXTURE_WEST;
} else {
    if (ray_dir_y > 0)
        texture_index = TEXTURE_SOUTH;
    else
        texture_index = TEXTURE_NORTH;
}
Each face can have a distinct texture loaded from an XPM file. That's what gives walls the appearance of different surfaces on each side: brick on north/south, stone on east/west.
One subtle trick: apply a slight darkening to horizontal faces (side == 1). Since these walls are parallel to the camera plane, they receive less "light" in the naive model. Dividing their color by 2 before drawing creates a convincing ambient occlusion effect with zero additional computation.
The Game Loop
The rendering step runs inside a tight loop:
void render_frame(t_game *game) {
    for (int x = 0; x < SCREEN_W; x++) {
        // ... DDA for column x, draw wall strip
    }
    mlx_put_image_to_window(game->mlx, game->win, game->img, 0, 0);
}

void game_loop(t_game *game) {
    double time_prev = get_time_ms();

    while (1) {
        double time_now = get_time_ms();
        double delta = time_now - time_prev;  // milliseconds since last frame
        time_prev = time_now;

        handle_input(game, delta);            // move/rotate proportional to delta
        render_frame(game);
    }
}
Movement and rotation speeds are multiplied by delta (time since last frame) to ensure consistent behavior regardless of frame rate. Without this, the game runs faster on faster hardware, a bug that plagued many early games.
From Raycasting to Doom to Modern Engines
Raycasting has one fundamental limitation: every wall must be the same height, and you can't have rooms above or below other rooms. The 2D grid can't support arbitrary geometry.
Doom (1993) solved this with BSP trees (Binary Space Partitioning). The map is split into a tree of convex sectors, each with its own floor and ceiling height. The renderer walks the tree back-to-front, drawing sectors in order. Walls are still vertical, but sectors can have different heights, creating stairs, elevated platforms, and multi-level spaces.
Quake (1996) moved to full polygon rasterization: actual 3D geometry, vertex transforms, and a Z-buffer for correct depth sorting. The CPU did all the rasterization; hardware 3D acceleration didn't become standard until the late 1990s.
Modern engines use real-time raytracing, firing rays against actual triangle meshes and computing accurate lighting physics per pixel. The algorithm is conceptually similar to raycasting (fire a ray, find the hit, use hit information to determine color), but the geometry is genuinely 3D and the lighting model is physically based.
The raycaster in cub3d is where all of that starts. One ray per column. One distance per ray. One height formula. The simplicity is what makes the math legible. Once you've worked through it, the progression to BSP, to rasterization, to raytracing is a series of incremental extensions of the same core ideas, not a series of mysterious leaps.